How
Instructions for removing www from your web address

How to remove www from your website depends on your web server. The following instructions describe how to remove www using WordPress, Apache, and IIS.
WordPress
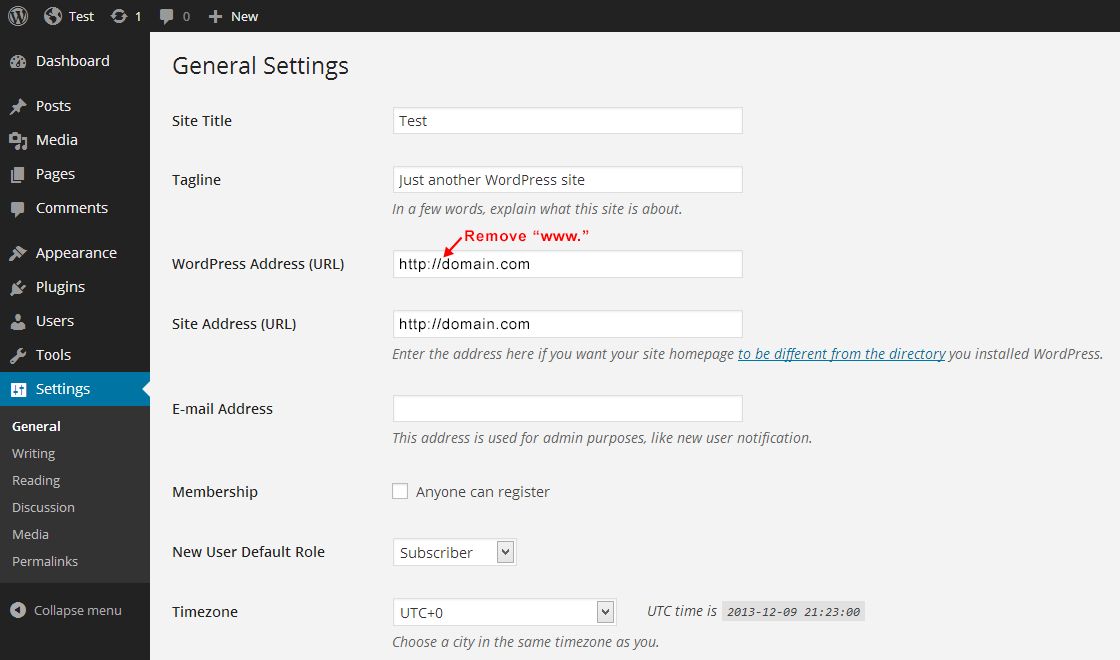
Removing the "www" from your WordPress site is easy. Simply open the WordPress Dashboard in your web browser and select General Settings in the left sidebar.
Delete the "www" from the WordPress Address and Site Address URLs as shown below. The appearance of the dashboard may differ slightly depending on what version of WordPress you are using.

Click the Save Changes button at the bottom of the screen to implement the change. Your WordPress web address will be www-free!
Apache
Most websites on Apache servers are created to use the "www" prefix by default. When removing "www" it's important to redirect all traffic from the old URLs to the new ones without "www." You can do this by making a simple change to the .htaccess file in the root directory of your website.
If your website already has an .htaccess file, you should edit the existing file so that you don't overwrite any other website settings. Since the file begins with a dot, it may be hidden by default. You may have to turn on the "Show hidden files" option in your file browser to see it. If there is no .htaccess file in the root directory of your website, you can simply create a new plain text file called .htaccess and upload it to the root directory of your website.
Make sure to back up your .htaccess file before making changes to it, since incorrect syntax can cause server errors and make your site unreachable. If your changes cause unexpected problems, you can always revert to the backup.
Add the following code to the .htaccess file:
RewriteEngine On
RewriteCond %{HTTP_HOST} ^www.dropwww.com$
RewriteRule ^/?(.*)$ http://dropwww.com/$1 [R=301,L]
* Make sure to replace "dropwww.com" with your domain name.
The first line activates an Apache module called "mod_rewrite". The second line defines the condition for rewriting (or redirecting) any URLs that start with "www." The third line rewrites the URL without the "www" and includes a 301 redirect HTTP code. This lets the browser and — most importantly — search engines know that the URL has been permanently moved to a URL without "www."
Moving from HTTP to HTTPS?
If you want to use SSL and therefore a URL that begins with https://, you can use the .htaccess code below to force HTTPS and no www in one fell swoop.
RewriteEngine On
RewriteCond %{SERVER_PORT} 80
RewriteRule ^(.*)$ https://dropwww.com/$1 [R=301,L]
Pretty simple IMO.
Once you've made the changes to your .htaccess file, upload it to the root directory of your website. Now, when you visit a page on your website with "www", the URL should automatically redirect to the same page without "www" in the URL.
IIS (Windows Server)
Microsoft Internet Information Services (IIS) uses a web.config files to store configuration information for individual websites. You can edit this XML file to customize your website settings, but make sure to back up the web.config file before making changes to it. This will allow you to restore the backup in case any unexpected changes occur.
Open the web.config file, scroll down to the <system.webServer> section and add a new rule between the <rule> and </rules> tags.
<system.webServer>
<rewrite>
<rules>
<rule name="Drop WWW" enabled="true" stopProcessing="true">
<match url=".*" />
<conditions>
<add input="{HTTP_HOST}" pattern="^www.(.*)" />
</conditions>
<action type="Redirect" redirectType="Permanent" url="https://{C:1}{REQUEST_URI}" />
</rule>
</rules>
</rewrite>
</system.webServer>
NOTE: Replace url="https://..." with url="http://..." for regular HTTP (non-HTTPS) traffic.
The <conditions> section in the rule above checks if the URL starts with "www." If it does, the <action> section redirects it to the same URL without the "www." The redirectType="Permanent" attribute is important since it tells browsers and search engines that the URL without the "www" is the correct one.
 drop
drop